You are here: 5. Job Costing > 5.4. TRANSACTIONS Menu: Transaction Processing > 5.4.2. Transactions - Manufactured Job > 5.4.2.5. Adding Materials to a Manufactured Job > Add Items to Job - Allocations
Add Items to Job - Allocations

If there is insufficient stock of an item you are adding to a manufactured job, and a manual or automatic purchase order already exists for that item, you use this option to pre-allocate a quantity of the item from that purchase order to the job. This links the job to the purchase order in MDS so that when the goods are received in MDS, they can be automatically allocated to the job.

If stock of the item exists in another warehouse, you can also use this option to request a transfer of the item to this job.


Technical Tip

You create manual purchase orders for MJC as you would any other purchase order - using the MDS Purchase Order Creation program (refer to "Inventory – Purchase Order Creation").

Alternatively, Micronet will include the item on an automatic purchase order based on the quantity in the Qty Order field on the Add Items to Job screen (refer to "Adding Materials to a Manufactured Job"). For more information about automatic purchase orders, refer to "Inventory - Automatic Purchase Orders".

To pre-allocate an item on an existing purchase order to the currently displayed job, or to transfer the item from another warehouse:

  1. Display the Add Items to Job screen.

Refer to "Adding Materials to a Manufactured Job".

  1. Select ALLOCATIONS.

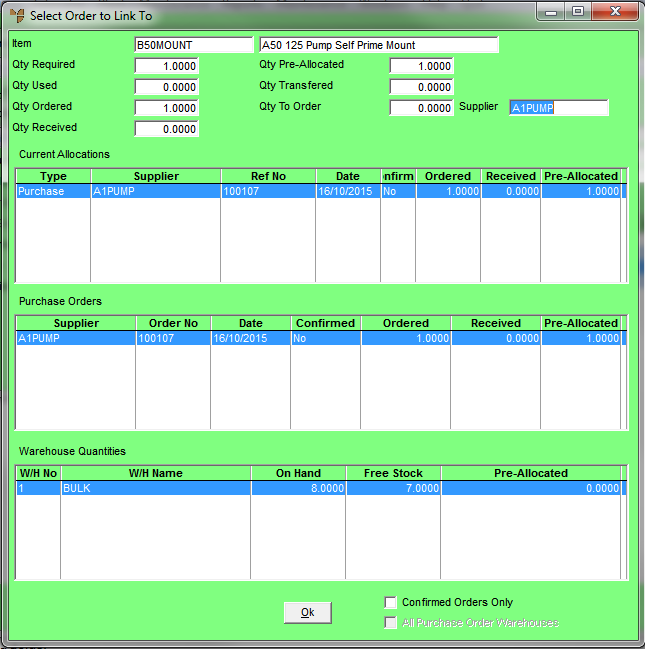
Micronet displays the Select Order to Link To screen.

  1. Complete the following fields:


Field

Value


Item

Micronet displays the item number and description of the item ordered.


Qty Required

Micronet displays the total quantity of the item needed for this job as entered on the Add Items to Job screen.


Qty Used

Micronet displays the quantity of the item available as entered on the Add Items to Job screen.


Qty Ordered

Micronet displays the quantity of the item to order for this job as entered on the Add Items to Job screen.


Qty Received

Micronet displays the quantity of the item received into stock but not yet allocated to orders or jobs.


Qty Pre-Allocated

Micronet displays the quantity of the item pre-allocated to this job. This field is updated as you pre-allocate quantities of the item using the steps below.


Qty Transferred

Micronet displays the quantity of the item requested for transfer from another warehouse. This field is updated as you transfer quantities of the item using the steps below.


Qty to Order

Micronet displays the balance of the item still to be ordered after pre-allocations and transfers.


Supplier

Micronet displays the supplier for the item.


Current Allocations

Micronet displays any quantities of the item that have already been pre-allocated to purchase orders or transfers from another warehouse.


Purchase Orders

Micronet displays all manual and automatic purchase orders that exist for the item.


Warehouse Quantities

Micronet displays all quantities of the item held in other warehouses.


Confirmed Orders Only

Check this box if you only want Micronet to display confirmed orders in the Purchase Orders section of this screen. Leave it unchecked to display all purchase orders.


All Purchase Order Warehouses

If your system is setup so purchase orders can be pre-allocated to different warehouses, check this box if you want Micronet to display all warehouses in the Warehouse Quantities section of this screen. Leave it unchecked to display only the default warehouse.

This field is only enabled if the Automatic Transfers on Receipt field is set to Yes on the Purchasing Configuration screen (refer to "Edit - Program - Purchasing").

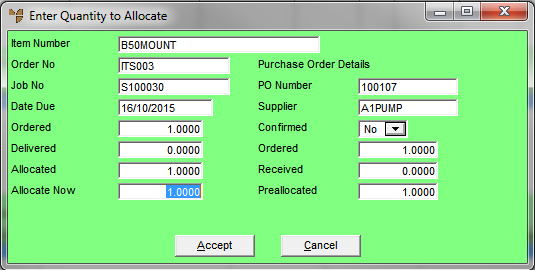
  1. To pre-allocate a quantity of the item to this job, double click on an order in the Purchase Orders section of this screen, or select a purchase order and press Enter.

Micronet displays the Enter Quantity to Allocate screen.

  1. In the Allocate Now field, enter the quantity of the item you want to pre-allocate to the current job and then select the Accept button.

Micronet redisplays the Select Order to Link To screen with the allocated quantity in the Current Allocations section.

  1. Repeat the steps above to perform further allocations.
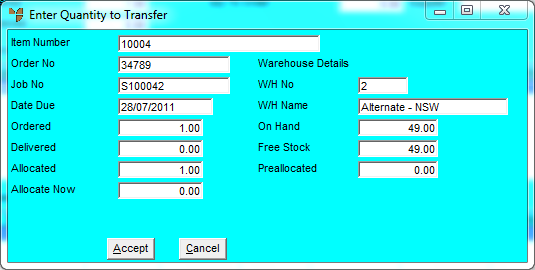
  1. To request a transfer of the item from another warehouse to this job, double click on a warehouse in the Warehouse Quantities section of this screen, or select a warehouse and press Enter.

Micronet displays the Enter Quantity to Transfer screen.

  1. In the Allocate Now field, enter the quantity of the item you want to transfer from the warehouse to the current job and then select the Accept button.

Micronet redisplays the Select Order to Link To screen with the quantity requested for transfer in the Current Allocations section.

  1. Repeat the steps above to perform transfers from other warehouses.
  1. When you have finished transferring items, select the Ok button on the Select Order to Link to screen.

Micronet redisplays the Add Items to Job screen . If you entered a transfer request for the item, Micronet creates a transfer batch.


Technical Tip

The allocation is completed during the goods receipt process in MDS - refer to "Inventory - Goods Received".

For information on how stock transfers are completed, refer to "Inventory - Adjustments - Transfer To Warehouse".